Age of Apocalypse: Morph
by Trip Somers
|
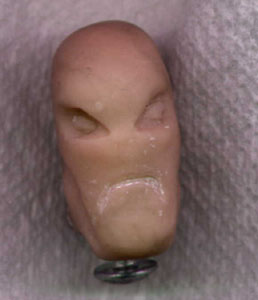
Morph, here, was my first [successful] custom figure. I find it funny (among other things) that I was able to sculpt his head as well as I did. I don't mean to sound like I'm bragging, but I've tried to do stuff like that since then and haven't been able to come anywhere near that close in quality of shape and expression (the lack of a nose might be the difference!).
The origin of this figure dates back to a May 29, 1998 due date for a ToyFare X-Men Homemade Heroes contest. Considering the due date was my birthday, the fact that I like the X-Men, and my previous interest in "figure art",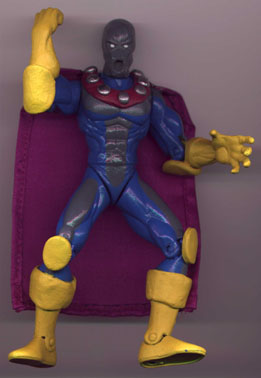 I figured that if I took my time, I could win this contest. Kind of like I was signaled into customizing by this contest. I actually started this figure as a scratch-made figure, but I realized that after I baked both legs, I realized I would have a problem articulating the figure, when I tried to put the screws in and the hips cracked. Doh!!! Despite this broken hips, I went ahead and sculpted a head. This first head wound up looking like those guys from the StarCraft video game. Sadly, though, I didn't finish figure until mid-July! Doh!!! Because of this, I wasn't able to enter the contest...
He was made from a Spider-Man Spider Force: Beetle figure, which is definitely one of the best male custom bodies yet. Before I started the figure, I made sure that I had all my stuff ready: X-acto knife, Dremel, Super Sculpey, and all sorts of household sculpting tools.
The first step I took (which now can be viewed as pointless) was to take my x-acto knife and trim off those annoying protrusions of his mask. Considering that later I dremelled off most of his head, this step can be left out.
The next step involved me running out (with reference material in hand) to a comic shop to get some paint. I used Testors (a very rare occurrence) Pactra Gray and Blue for most of the figure, and made a big mistake when I chose my yellow. I'm not sure which paint I chose but I can assure you that it was very low quality. I brought the paints home and made test marks on the figure to see how well the paint would coat.
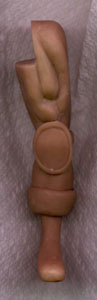
Having purchased and tested my paints I began the sculpting of his boot cuffs. Since this was my first custom figure, I made them a little too fat (no experience), but they turned out alright. If you notice, the Beetle figure has ridges on his fore-arms back towards his elbows. Instead of dremelling these away, I chose to "mask" the ridges with sculpey. This was just a thin layer of sculpey added over the ridges to make them blend into the forearm. If you look closely enough at the picture, you can see that I didn't do that so well. Before cooking the figure, I also added on those elbow and knee pads. They don't stick very well and often must be glued back on. In the future I'll need to find a better way to attach them. I then followed the instructions on the sculpey box to cook my work-in-progress. The first time it was cooked it came out alright, but later you'll see a downside to following the box's instructions. Now that I had some hard sculpey, I test the paints on it to see how well it would coat on the dried sculpey. Having passed the test, I moved on to the head...
The head was a slow painstaking process, which I feel I endured rather well. At first, I had just planned to sculpt the face on, so I began dremelling off the front of the Beetle's head. At this point I had knocked off the knee and elbow pads so many times that I knew I would have to wrap the whole head with sculpey in order for the face to stick. This caused me to dremel the entire head into nothing more than a ½" tall, ¼" wide peg above the neck!
After the dremelling, I just grabbed a big old blob of sculpey and slapped it around that peg! Constantly looking back and forth between my work and my reference I slowly found the correct shape of his head. Unfortunately, I messed up the face so badly on this attempt that I wound up taking the whole head off (just the sculpey). Upon starting over, I realized that I was doing a better job and continued to work at a slightly faster pace. Even though I started over on his face somewhere around 15 times, I eventually got the expression I wanted. The really good news is that the expression fit with every pose on the figure I could think of. I even contorted the figure into some weird not-humanly-possible pose and his face turned from anger to pain. That's pretty amazing if you ask me!
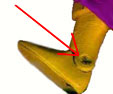 Upon baking this new sculpey, I realized how stupid it was to follow the directions on the sculpey box. While in the oven, Morph became so soft that his right foot almost fell off and came completely out of one side of his ankle. From then on, I took a tip from the Customize! list and started boiling my sculpey. This is better for two reasons: it's shorter, it's not as hot. It's also kinda bad for two reasons: it doesn't get as hard, you might burn yourself with the scalding hot water. Boiling is Better!!!
Next, I used the pattern from a Toy Biz Age of Apocalypse Magneto figure for a template to make the neck/chest band thingy around his chest/neck/shoulders. We really need a name for that thingy... I took some sculpey rolled it out and put the "ring" around his chest/neck/shoulders. Following this quick and easy procedure, I made a bunch of small balls and mashed them down into the "ring". This was followed by a quick and careful baking (of course, being especially sure to keep that loose foot from falling off!)
After that, I just applied my paints and that was that. Have fun, making your own Age of Apocalypse Morph. Despite my description, it really was fun!
This recipe was provided by Trip Somers a.k.a. DarkMonkE. You can see more of his work at his web page DarkMonkE's Action Figure Stuff Page. To return to Customize It! just close this window, 'cause you never left!